Creating and Managing Projects
This page covers how to use e Builder (Core) to create a development project and to update assets, switch the configuration, and build from the VSCode UI.
You can skip the creation steps. However, you still need to open the project folder in VSCode (how to open it) and trust the folder. The same applies when you use debugging or testing.
Creating a Project
You can create a new project from the VSCode UI.
- Open the folder where you want to create the project in VSCode.
- Click the e Builder icon in the Activity Bar.
- Click Initialize Project.
- A form screen (a tab) opens. Fill in the fields and click Continue to review.
- Check what you entered and click Run.
- When it finishes, the path of the created project and an Open Folder button appear.
- Click Open Folder to open the project you created.
The project is created directly under the folder you have open, as a folder named after the project name you entered. The extension treats the folder you have open as the project, so reopen the folder you created before continuing with the steps below.
The form fields are the same items Accel CLI asks for interactively. For what each field specifies, see Creating a New Project.
If you enter a value that is not allowed, an error appears below that field. You cannot move on to the review screen while an error remains.
Trusting the Folder
VSCode opens an untrusted folder in Restricted Mode. In Restricted Mode, extensions that execute code are disabled. The e Builder (extensions) also run build scripts and test code, so they do not work in Restricted Mode.
The first time you open the project, you are asked "Do you trust the authors of the files in this folder?" Choose "Yes, I trust the authors".
If you have already opened it in Restricted Mode, or if you want to change the setting later, run Workspaces: Manage Workspace Trust from the Command Palette.
For details on Restricted Mode, see the official documentation at https://code.visualstudio.com/docs/editing/workspaces/workspace-trust.
Verification
Open the e Builder icon in the Activity Bar. You are ready once the following four items are listed.
- Update assets (update)
- Switch configuration (switch)
- Deploy (deploy)
- Build (build)
To the right of each item, details such as the current iAP version and the connection target appear in dimmed text.
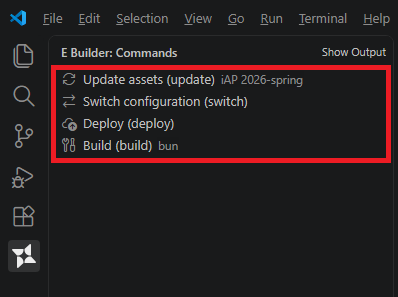
If "This workspace has not been initialized as an e Builder project yet." appears, check that the folder you opened is the project root (the folder that contains pom.xml).
Updating Assets (update)
The project template is updated periodically. To bring in the latest content, click Update assets (update) in the sidebar.
- A form screen opens. If you are not changing any settings, just click Continue to review.
- Check the content and click Run.
- If a confirmation dialog appears during the run, read it and make your choice.
For how files you edited are handled and how to resolve overlapping updates, see Updating the Template.
If you run it while you have uncommitted changes, you are asked whether to continue. Committing before the update lets you return to the pre-update state if anything goes wrong.
Switching the Configuration (switch)
To change only the configuration of the modules, features, and agents you use, click Switch configuration (switch) in the sidebar. It does not download assets, so it finishes faster than update.
The flow is the same as update (input → review → run).
Selecting a Preset in the form switches the three fields for modules, features, and agents to the preset's contents at once (while a preset is selected, you cannot select the three fields individually). The same fields are also in the Update assets (update) form.
You create and delete presets with the Accel CLI command bunx @intra-mart/accel preset.
Building (build)
Clicking Build (build) in the sidebar opens a terminal and runs the build with the package manager configured for the project (running bun run build, for example).
The build requires Java (JDK) and Maven. For the installation steps, see Prerequisites and Required Tools.
For the user module the build produces, see Building the user module.
Once the build finishes, go on to Deploying to the Server.
Troubleshooting
Logs and error details for a run are recorded under e Builder (Core) in the Output panel. You can open it directly from the Show Output button at the top right of the sidebar. For how to open the panel, see Troubleshooting.
Limitations are summarized in Limitations.