Deploying to the Server
This page covers how to deploy a built user module to the shared development server from the VSCode UI.
The deployment target is a staging provided by the AI-native Development Support Feature. For the concept of stagings, see AI-native Development Support Feature.
Prerequisites
- The AI-native Development Support Feature is installed on the destination iAP
- An API key has been issued
- The destination staging has been created
- The project has been built (a zip has been generated in the
targetfolder)
For how to issue an API key, see Deploying with the Accel CLI; for how to create a staging, see Staging Management.
The Deployment Flow
- Enter the connection details
- Test the connection
- Choose what to deploy
- Choose whether to run setup
- Run it and check the result
1. Enter the Connection Details
Open the e Builder icon in the Activity Bar and click Deploy (deploy) to open the form screen.
| Field | What to enter |
|---|---|
| Endpoint URL | The base URL of iAP (for example, https://example.com/imart) |
| API key | The API key you issued |
If you have connected before, the endpoint URL is prefilled with the previous value. For the API key, only whether one is stored is shown. If you are not changing it, leave the field empty.
2. Test the Connection
Click Test connection. When the connection succeeds, the list of stagings on the destination is retrieved and becomes selectable.
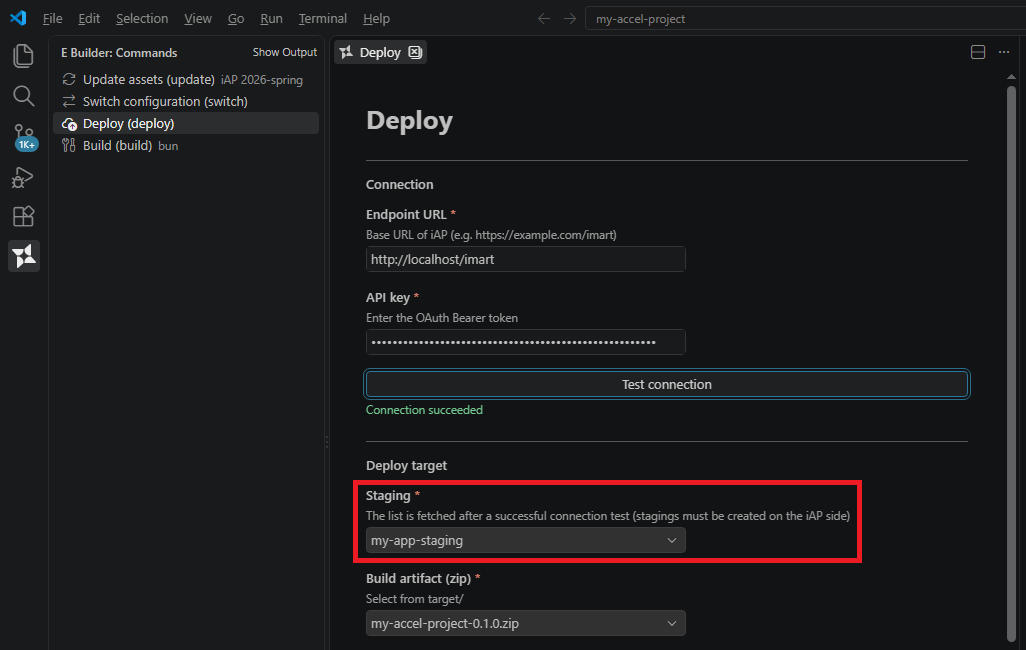
Stagings must be created on the iAP side in advance. For how to create one, see Staging Management.
3. Choose What to Deploy
| Field | What to choose |
|---|---|
| Staging | The destination staging |
| Build artifact (zip) | A zip file under the target folder |
| Additional archives (optional) | Specify this to also send .imm / .zip files that you manage separately |
| Deployment description (optional) | A description that helps you identify it later (for example, v1.2.0 release candidate) |
If there are no build artifacts to choose from, run Building first.
4. Choose Whether to Run Setup
You can run the setup definitions contained in the assets at the same time as the deployment.
| Field | Details |
|---|---|
| Run tenant environment setup (all at once) | Runs the setup definitions (DDL, initial data, and so on) contained in the assets |
| Run sample data setup (all at once) | Runs the sample data setup contained in the assets |
Running setup is not confined to the staging. It is applied to the tenant's database and affects other users of the same tenant as well.
If you do not need it, clear the checkbox before you run the deployment.
The VSCode UI only supports running them all at once. To choose individual configuration files, use Accel CLI in interactive mode, or run setup from the AI-native Development Support Feature's Staging Detail Screen.
5. Run It and Check the Result
Click Continue to review, check the content, and click Run. Progress appears in the form screen. The run continues even if you close the tab.
When the deployment succeeds, a link to the staging detail screen appears on the result screen. Clicking it opens a browser so you can review the staging contents right away.
Verification
- The result screen shows a success
- You can open the staging detail screen from the link
If you ran setup, its result also appears on the result screen. Setup may fail while the deployment itself succeeds. The result screen shows the two outcomes separately.
Troubleshooting
You can check error details under e Builder (Core) in the Output panel. For how to open it, see Troubleshooting.
Limitations are summarized in Limitations.